Are you ready to take your gardening skills to the next level? If so, then learning how to build your own garden trellis is the perfect project for you! In this article, we will share some helpful DIY tips that will guide you through the process of creating a beautiful and functional trellis for your plants. Whether you’re a seasoned gardener looking for a new challenge or a beginner determined to add some vertical interest to your garden, these tips will provide the guidance you need to successfully build a garden trellis. So grab your tools and get ready to get your hands dirty – let’s start building!

Choosing the Right Location
When it comes to building a garden trellis, one of the first things you need to consider is the location. The success of your trellis depends on finding the perfect spot in your garden that will provide optimal growing conditions for your plants. Start by considering the sunlight in your garden. Most climbing plants thrive in full sun, so choose a location that receives at least six hours of direct sunlight each day.
Another important factor to consider is the soil type. Different plants have different soil requirements, so it’s crucial to evaluate the soil in your chosen location. Take a sample of the soil and assess its texture and fertility. Sandy soil might require additional amendments to improve drainage, while clayey soil might need additives to enhance its fertility. Knowing your soil type will help you choose the right plants for your trellis and ensure their success.
Lastly, check for adequate space in your chosen location. Some climbing plants can grow quite large and spread out, so you need to make sure there is enough room for your trellis system to accommodate their growth. Consider the height and width of your plants and plan accordingly. Adequate space will not only allow your plants to grow and thrive but also make your trellis system visually appealing.
Selecting Materials
Once you have chosen the perfect location for your garden trellis, it’s time to select the materials that will make up your structure. The choice of materials will depend on your personal preferences, budget, and the style of your garden.
Wooden posts are a popular choice for building a trellis due to their durability and natural beauty. Cedar and redwood are particularly popular because they are naturally resistant to rot and insect damage. Make sure to choose posts that are the appropriate height for your trellis design and that can withstand the weight of your climbing plants.
Wire or netting is another essential material for your trellis. It provides the necessary support for your plants to climb and attach themselves. Wire works well for heavier plants, while netting is better suited for delicate vines. Consider the weight and strength requirements of your plants when choosing between the two options.
Lastly, screws or nails will be needed to secure the different components of your trellis together. Choose the appropriate size and type of fasteners based on the materials you are working with. Stainless steel screws or galvanized nails are ideal choices as they are resistant to corrosion and will ensure the longevity of your trellis.
Measuring and Planning
Once you have gathered all the necessary materials, it’s time to start measuring and planning your trellis design. Proper measurements are crucial to ensure that your trellis fits and functions as intended.
Begin by determining the trellis height. Consider the mature height of your climbing plants and add a few feet for proper support. This will also help you determine the length of your wooden posts.
Next, measure the width and length of your desired trellis system. Take into account the available space in your garden and the number of plants you plan to grow. This will help you decide the overall size of your trellis.
With the measurements in hand, sketch out your trellis design. Visualizing your trellis on paper will make the construction process much easier, as it allows you to plan the placement of the posts and the spacing between the wires or netting.
Preparing the Ground
Before you can start building your trellis, it’s important to prepare the ground where it will be installed. This involves clearing the area, leveling the ground, and preparing the soil.
Begin by clearing any existing plants, weeds, or debris from the chosen location. This will provide a clean slate for your trellis and prevent any interference with the growth of your climbing plants.
Next, level the ground to ensure that your trellis stands straight and stable. Remove any high spots and fill in any low areas. Use a shovel and a rake to achieve a level surface.
Once the ground is leveled, it’s time to prepare the soil. Loosen it with a garden fork or a tiller to promote better drainage and aeration. Add organic matter such as compost or well-rotted manure to improve the soil’s fertility and water-holding capacity. Work the amendments into the soil thoroughly to create a welcoming environment for your plants.

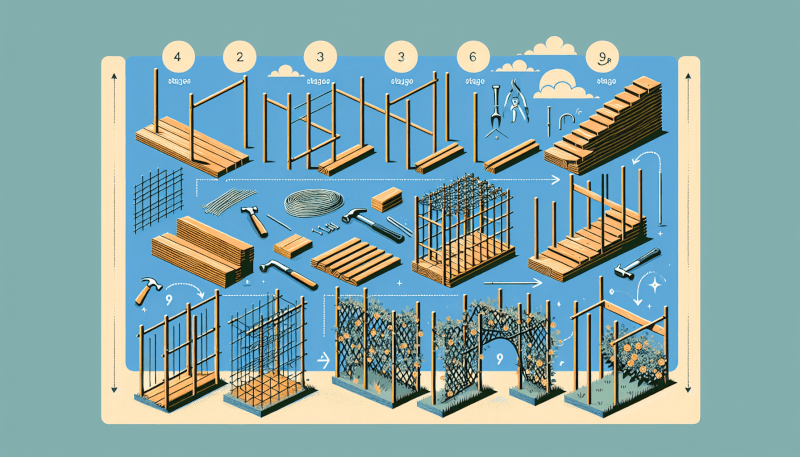
Installing the Trellis
With the ground prepared, it’s time to start building and installing your trellis. The installation process involves digging holes for the wooden posts, securing the posts, and attaching the wire or netting.
Begin by marking the locations where the posts will be installed. Use a tape measure and stakes to ensure that the spacing is even and that the trellis will be balanced. Dig the holes for the posts, making sure they are deep enough to provide stability and support. A post hole digger or a shovel can be used for this task.
Once the holes are dug, place the wooden posts into the holes, making sure they are straight and level. Backfill the holes with soil, packing it firmly around the posts to secure them in place. Use a level to double-check the vertical alignment of the posts.
After the posts are secured, it’s time to attach the wire or netting. Use appropriate fasteners such as staples or wire clips to secure the material to the posts. Start at the bottom and work your way up, ensuring a taut and secure installation. Space the wires or netting according to your trellis design, allowing enough room for your plants to climb and spread out.
Protecting and Supporting Plants
Now that your trellis is installed, it’s time to focus on the most important aspect: supporting and protecting your plants as they grow. Training your plants to climb, using ties or twine for support, and providing extra stakes or lattice panels will ensure their healthy growth and prevent damage.
Train your plants to climb by gently guiding their stems towards the trellis. As they grow, secure their stems to the trellis using soft ties or twine. Avoid using materials that may cut into the plants or hinder their growth. Regularly check the ties and adjust them as needed to prevent constricting the plants.
In addition to ties, providing extra stakes or lattice panels can offer additional support to heavy or large-growing plants. This will prevent the trellis from sagging and ensure the stability of the structure. Make sure to install the additional supports as needed and secure them firmly to the trellis.

Maintaining the Trellis
To keep your trellis in optimal condition and ensure its longevity, regular maintenance is required. This includes regular inspections and repairs, trimming and pruning, and applying protective coatings.
Regularly inspect your trellis for any signs of damage or wear. Look for loose wires or netting, rotting posts, or any other structural issues. Address these issues promptly to prevent further damage and ensure the stability of your trellis.
Trimming and pruning your plants regularly is also essential to maintain the health and aesthetics of your trellis. Remove any dead or diseased branches to prevent the spread of diseases. Prune any excessive growth to maintain the desired shape and size of your plants. This will also prevent overcrowding, which can lead to poor airflow and increased susceptibility to diseases.
Applying protective coatings to your trellis can enhance its durability and resistance to the elements. Consider using weatherproof paint or stain to protect wooden posts from rot and decay. This will ensure that your trellis remains sturdy and beautiful for years to come.
Decorating the Trellis
A garden trellis doesn’t have to be just a functional structure; it can also be a decorative element in your garden. After all, a beautiful trellis can add charm and character to your outdoor space. Consider painting or staining your trellis to match the aesthetics of your garden. Choose colors that complement the surrounding plants and structures.
Another way to decorate your trellis is by adding decorative elements. Install brackets or hooks to hang potted plants, wind chimes, or bird feeders. Hang beautiful outdoor art pieces or string fairy lights along the trellis to create a magical ambiance in the evening. Let your creativity shine through and transform your trellis into a visually appealing focal point in your garden.
Lastly, consider growing vines or flowering plants on your trellis for a natural and colorful decoration. Choose climbing plants that suit your climate and gardening preferences. Whether it’s vibrant flowers, lush foliage, or delicious fruits and vegetables, letting plants grow on your trellis will add life and beauty to your garden.

Alternative Trellis Ideas
If you’re looking for unique and creative trellis ideas, there are plenty of alternatives to traditional designs. Consider using bamboo poles or branches to create a rustic and naturally beautiful trellis. Bamboo is known for its strength and durability, making it an excellent material choice for a trellis. Additionally, repurposing old materials such as ladders, window frames, or even old cribs can add a touch of whimsy and character to your garden.
Another alternative is creating a living trellis using potted plants. Select tall, upright plants that can act as natural supports for climbing plants. Arrange the potted plants strategically, leaving space for the climbers to grow and intertwine. This living trellis not only provides a functional structure but also adds a lush and green element to your garden.
Enhancing Trellis Functionality
To make your trellis even more functional, consider adding hooks or shelves to provide additional storage or display space. Hooks can be used to hang gardening tools, watering cans, or even small planters. Shelves can hold potted plants, decorative items, or garden essentials. By incorporating these elements into your trellis design, you can maximize the functionality of your outdoor space.
Incorporating lighting into your trellis can create a delightful atmosphere in your garden, especially during evenings and nights. Install outdoor lights along the trellis to illuminate the climbing plants and create a cozy and inviting ambiance. Solar-powered lights are an eco-friendly option that requires no wiring, making them easy to install and maintain.
For gardeners seeking convenience and efficiency, installing a drip irrigation system can be a game-changer. This system allows you to provide consistent and precise watering to your plants, reducing water waste and ensuring that your climbers receive the right amount of moisture. Attach the drip irrigation system to your trellis and enjoy the benefits of automated and efficient plant care.
Building a garden trellis is a rewarding project that can add beauty and functionality to your garden. By choosing the right location, selecting the appropriate materials, measuring and planning carefully, preparing the ground properly, and maintaining your trellis regularly, you can create a stunning addition to your outdoor space. Don’t forget to decorate your trellis, consider alternative design ideas, and enhance its functionality to make the most out of this versatile structure. Enjoy the process of building and watching your plants thrive on the trellis you’ve created with your own hands!

